
The Hellish Battle of the St. Eloi Craters, 1916: Pt. 1
As a novice graduate student in my first semester of my Master’s in History (oh, what a long way I had to go), I took a historical research and methods course. We were instructed to write a research paper, some 50-60 pages long.
There was a topic I was immediately drawn to. It was the Canadians and the Battle of Vimy Ridge, 1917, and how it helped form their national identity.
Why?
Because it was personal. My great-grandfather, Thomas E. Roberts, was there. On the last day of the battle, Pvt. Roberts was fighting alongside his battalion, the 27th Battalion City of Winnipeg Battalion, when he took a machine-gun burst to the leg. One round cut straight through his knee, essentially leaving him disabled for life.
While looking back on that paper, I found it horrible. A budding historian who had a long way to go. But it lit a spark. I first discovered the Canadian National Archives, the Library and Archives of Canada. This site has incredible resources, a huge portion of them digitized. I found things like my great-grandfather’s X-rays from his wound, his medical records, and his pay records.
His medical records sparked a new interest.
On April 5, 1916, he was evacuated from a place called St. Eloi and hospitalized for severe shell shock. It was so bad he couldn’t speak for months. So, I strove to see what kind of experience would leave Private Roberts so traumatized that he couldn’t speak. In fact, he was hospitalized until October 1916, after which he was shipped off to fight on the Somme front with the 27th.
When I study the St. Eloi crater actions, I can only try to imagine the hellish experience he went through. Hellish is a good way to describe it. So, this is the first part of a series on the Actions at St. Eloi Craters. This is the story of the British and Canadians who endured one of World War One’s lesser-known battles.
St. Eloi today is a Belgian town known as Sint-Elooi, which is part of the larger area known as Ypres. The village, or hamlet, is quaint, surrounded by Belgian farmland. The hamlet is filled with charming red brick buildings, and it’s more of a throughway to get to bigger places. It’s hard to picture it as a part of the vaunted Ypres front during WWI. Instead of lush fields, as they are today, the ground was obliterated, waterlogged, reeking with the stench of death and decay.
To study his experience at St. Eloi, I decided to start at the beginning: the British offensive at St. Eloi, which started on March 27, 1916. The Canadian experience will come in a second article.
St. Eloi was part of the Flanders front, near Ypres.
Ypres, and the surrounding region and province known as Flanders, was synonymous with the British Expeditionary Force during World War I. Ypres was historically one of Belgium’s most important cities, being a key economic powerhouse in the region, especially in the textile industry. While the city in scope of size and importance had dropped by 1914, it was still an important regional marketplace. The fighting around Ypres had ground the city into rubble by the war’s end.
In 1914, the professional, hardened British Army clashed with the green German Army in this corner of Belgium, in the First Battle of Ypres (October 19-November 22, 1914). German forces slammed into the British again and again. The small British professional army, with famous names like the Coldstream Guards, Black Watch, and the Connaught Rangers, was decimated, requiring a flood of British volunteers to fill the ranks. The British were successful; they held off the Germans, but were now locked in place, squeezed into a salient.
That was the beginning.
By April 1916, neither army had moved much on the Flanders front. Fighting there had been horrific, but neither side gained much ground. In April 1915, the Germans tried to crush the Ypres salient while releasing a new, deadly weapon: gas. This new German push, the Second Battle of Ypres, failed to dislodge the British but tightened the German grip around the Ypres salient.
There was still plenty of fighting in between major battles. Things had settled into typical Western Front World War I trench warfare. The two sides were constantly exchanging artillery fire, conducting raids, and trying for smaller victories in the way of more localized objectives. Frontline British and later Canadian soldiers (among other Commonwealth nations) lived under constant threat of artillery, snipers, raiders, and general assaults, all while living in the horrendous conditions that were notorious around Ypres.
Ypres was one of the worst landscapes for fighting in all of military history. Especially for Great War tactics. Flanders stood over a stand of low, reclaimed marshland with an extremely high water table. Digging too deep to entrench meant hitting water, forcing many British to build upwards instead, stacking sandbags and building up walls to hold their ground. The incessant drizzle and gray skies made conditions worse. Soldiers lived in constant dampness, and the sun rarely appeared long enough to dry out the world around them.
If there’s one thing everyone with an interest in World War I has heard of, it’s the mud of Flanders Fields. The historically proven drainage systems were destroyed early on, leaving the Ypres ground soaked. The ground there is made of thick clay, and once it was wet, the terrain turned dangerous, creating a heavy, gelatinous, and sucking field of muck. The ground was constantly pummeled by artillery, mortars, bombs, and bullets, and disturbed by fortifications, creating a dreadful hellscape littered with debris, shell craters, and remnants of dead men and animals.
Fighting in Flanders dragged on for the duration of the war, claiming the lives of over half a million British and Germans. Collectively, both sides suffered over 1.5 million casualties in this region. In fact, Thomas Roberts’s youngest brother, “Harry” Roberts, was killed in the spring of 1915, fighting on the Flanders front at 19.
St. Eloi and the War
For World War One soldiers, holding the high ground was critical to defense. The Germans were successful in holding the high ground, where they could fire down defensively, while monitoring Allied trenches. Ypres from the ground looks nearly flat, making any minor swells, or “hills,” advantageous for WWI armies. This gave St. Eloi a place of particular importance.
St. Eloi may seem like an inconsequential little Belgian town, but it sat near two key pieces of high ground, roughly 3 miles south of the city of Ypres itself. The Bluff, a stand of ground nearly 30 feet high, occupied ground roughly 1.5 miles to the east of St. Eloi, while directly south of the town stood “the Mound,” a German-occupied 30-foot, artificially made hill that overlooked the British trenches below.
Unusually, the lines around St. Eloi turned, running east-west. This ran contrary to the usual Western Front, North-South direction. The Germans, with their strong front line, were entrenched on the Mound in a way that jutted into the British lines around St. Eloi. This German salient was roughly 600 yards long, bowing forward to threaten the British below.
What happened before the Actions of the St. Eloi Craters?
On February 4, 1915, the Germans attacked the British 28th Division around St. Eloi, capturing key ground for a few days, but ceded it to the British. The Mound was the desired aim in the region, and to take it, the Germans used another weapon of WWI: the mine.
Mining operations during World War I took the war to a subterranean level, where both sides tried to break the Western Front siege in another way. German pioneers and British diggers fought a different war, tunneling their way under enemy trenches hoping to blow a hole in the line, while counter-mining operations tried to stall enemy activity.
Desperate to break the British hold on and around St. Eloi, the Germans blew two mines on March 14, 1915, launching a large assault. Using the surprise to their advantage, the German attackers broke the British hold around St. Eloi, taking the Mound with it. The British 80th Brigade fought viciously to retake the ground and the Mound with it. In the dark, around midnight, they launched their counterattack. Fighting devolved into a bitter hand-to-hand struggle that left St. Eloi in their hands, but the Germans kept their grip on the Mound, thus holding the high ground.
Fighting continued around the Mound and St. Eloi throughout the year and into 1916, but most of the British operations moved underground, where the tunnellers tried to shut down German miners. The British shifted to undertake their own underground offensive.
The Mound of St. Eloi was a man-made spoil heap, and in the thick, waterlogged ground of Flanders, the British had to tunnel deep under the ground, driving their shafts 50 to 60 feet down. One can only imagine the backbreaking work of churning through that thick, blue clay. They moved towards the German mines, but had to work diligently to keep their project from being discovered. That required stopping the German miners in their tracks. Whenever the British found a German mine, they blew it, using smaller explosive charges to collapse the German tunnels.
Under the thick, clay ground of St. Eloi, the British finally made it to a place directly under the German lines. Galleries were cut into the ground and packed with ammonal charges. Above them the Germans still went about their daily lives in the trenches, not knowing that below their feet, 50 to 60 feet below, the British tunnellers were about to blow a hole in their line.
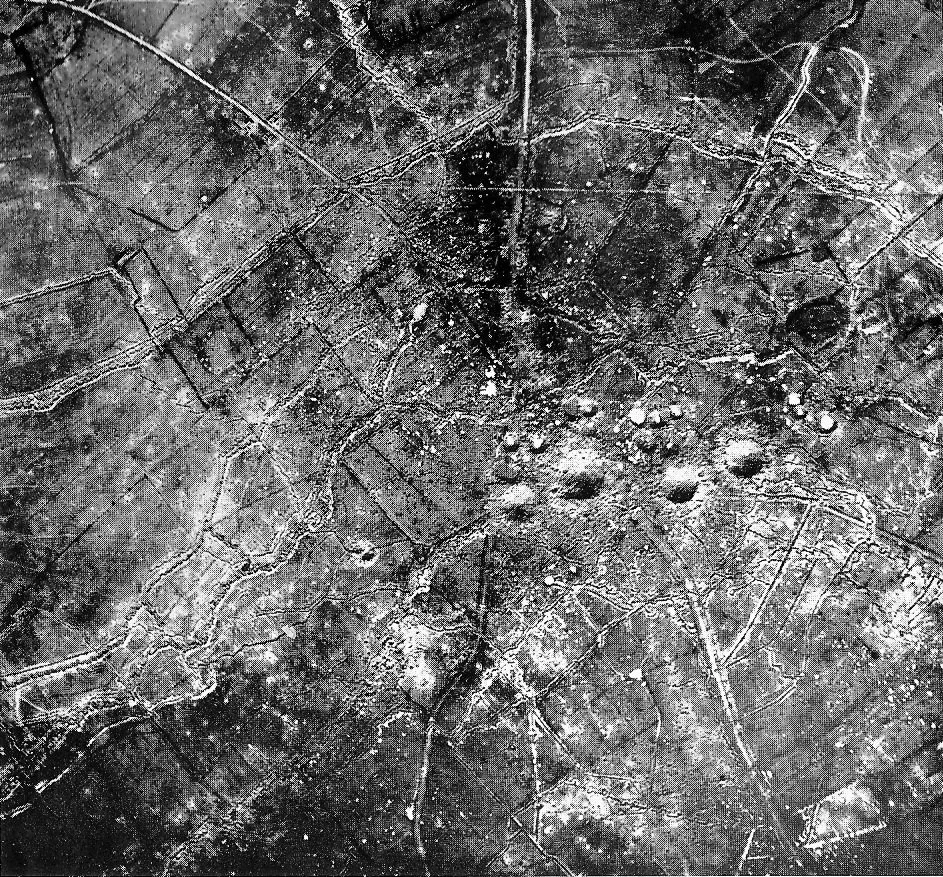
An Aerial View of the mine craters.
Why was St. Eloi important to the British and Canadians?
St. Eloi is often placed on the historical back burner because of the context surrounding the battle. On February 21, 1916, Germany launched its famed offensive at Verdun, which would become one of WWI’s most infamous standoffs. Germany, hoping to break the will of the French people, knowing the fragile political situation in France, picked the symbolic city of Verdun as their target.
The German plan, executed by General Erich von Falkenhayn, planned to drag out the battle so that the “forces of France will bleed to death.”
The French were desperately clinging to the land around Verdun, but needed something to relieve the pressure. While the new British overall commander Douglas Haig was planning a massive offensive at the Somme, something needed to be done to prevent German reserves from being diverted to Verdun. French Commander-in-Chief Joseph Joffre badgered Haig with letters, demanding action. In March, Joffre’s demands in meetings with Haig intensified, but the British general wouldn’t launch a major offensive.
At a meeting on February 14, the overall French commander pushed Haig to 1) wear down German reserves 2) take over the French 10th army’s front in the Artois sector, nearly 50 miles from Ypres. Haig claimed in a letter to King George V that he’d given an interesting enough argument to convince Joffre of a different, better plan.
He agreed to help, but by local, smaller actions. These would be intense, pressuring the Germans. Joffre, Haig, and other high command figures knew the Germans had ample reserves around Flanders, and if they were shifted to Verdun, it could break the French there.
Targets were selected by determining places where the Germans would commit their reserves if attacked. On a flat battlefield, like Ypres, having the elevated ground gave a crucial advantage.
The smaller, focused action fit the strength of one of Britain’s top brass, General Herbert Plumer, commander of Britain’s 2nd Army on the Ypres front. Rather than fretting about grand strategy, Plumer was one for smaller actions, a bite-and-hold way of fighting wars. He was also a proponent of blowing up mines, to the point that he was later known as Baron Plumer of Messines. Messines was a later operation to cause devastation via another massive mine.
St. Eloi fit the mold for a smaller bite-and-hold style of battle. It was one where the British wouldn’t have to commit to a larger overall offensive, coming to the aid of the French, while taking a key strategic aim.
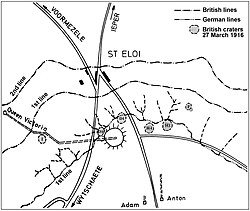
A Map of the Craters. Credit to By ViennaUK - Own work, CC BY-SA 4.0, https://commons.wikimedia.org/w/index.php?curid=53210386
Aside from the objective being key, time was of the essence.
Tunneling had been a constant activity around St. Eloi. The ground around the town was already littered with old craters from mines blown at earlier times in the war, something that would add to the confusion in the later battle.
Mining activity on both sides brought the war underground. The British were constantly discovering German mines. Finding these tunnels, they used camouflet, a small bomb, to collapse the tunnels on the German miners. The Germans were seeking the British tunnels and the galleries that were inevitably placed.
This type of claustrophobic warfare makes the hair on the back of your neck stand up. You were constantly tunneling, not knowing if the enemy was listening, waiting to bury you alive.
By March 27th, the day of the British offensive to take the Mound, there was no time to waste. Mine galleries packed with ammonal were ready to blow. They were filled accordingly:
Mine 1: 1,800 lb
Mine 2: 31,000 lb
Mine 3: 15,000 lb
Mine 4: 13,500 lb
Mine 5: 12,000 lb
Mine 6: 600 lb
German mining activity in the area meant the British were under threat of discovery. There was no time to waste.
March 27: The British Attack!
As a historian, I have to ask: why? That’s the key to researching as a historian. The entire St. Eloi saga was a failure, and I have to ask: why?
On March 27th, the British successfully blew their mines, annihilating the German front lines. The Germans defending the line at St. Eloi weren’t hardened combat veterans, but mostly replacements of the German 46th Reserve Division. The 216th Reserve Regiment took the brunt of the explosion, along with elements of the 215th and 210th regiments.
The official British history of the war says:
“The mines were successfully exploded at intervals of a few seconds: the trenches rocked, and to the onlookers it appeared as if a long village was being lifted through flames in the air.”
It’s impossible to imagine such a manmade force, lifting unaware Germans from their trenches, blowing them sky-high. Instantly, the Germans lost 300-500 men according to estimates, with many more being wounded or dazed.
Men of the 9th British Brigade jumped off just seconds after the mines erupted, barely waiting for the dust to settle.
The 1st Battalion of the Northumberland Fusiliers went right, rushing around Crater No. 1, while the 4th Battalion of the Royal Fusiliers went left, moving around Crater no. 6. The men of these battalions spent a chilly night on the ground. The cold, muddy ground of Flanders was blanketed with a mix of ice and snow. Forced to spend the night on the ground without a greatcoat to keep them warm, they were ready to move.
The battle for the Northumberlands went off without a hitch. At 4:15 am, they jumped up from the muddy ground and moved, just thirty seconds after the mines erupted. They took the ground around Craters 1 through 3, taking minimal casualties; they captured a few shaken German defenders.
On the right, the Royal Fusiliers weren’t so lucky. A remaining German machine-gun and a group of defenders cut into their left. It was the beginning of a brutal struggle.
The Royal Fusiliers, charged with closing the gap and connecting with the Northumberlands, struggled, moving along the muddy ground, many of them pinned by machine-gun fire.
As they moved, the Germans responded to the mine explosion with artillery of their own, firing continuous barrages for the rest of the day.
For the Royal Fusiliers, the fighting turned into a bitter struggle. In some parts, the battle turned into a hand-to-hand struggle to expel the Germans from the remains of their battered trenches.
Throughout the fight, the Royal Fusiliers took heavy casualties. According to the official report, the Royal Fusiliers suffered 5 officers killed, 1 missing, and 4 wounded. Out of a total fighting force of 646 men engaged, they took 251 casualties. The reports stated the battalion lost much of its veteran leadership and could hardly piece together a serviceable unit in the aftermath.
Despite the casualties, the Royal Fusiliers believed they had captured their aim, taking the ground around Craters 4 and 5. This was a mistake.
While their reports were positive, stating they had taken the craters, they had actually taken the ground around Crater 6. What they believed to be a second crater was a remnant of an older mine explosion.
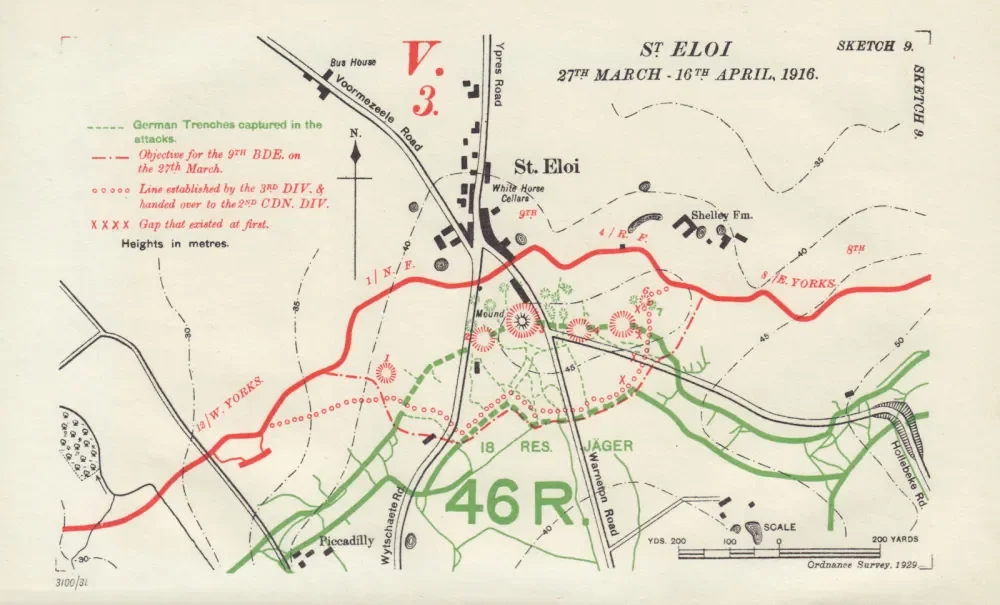
This map shows the position of the British units who attacked on March 27, 1916.
Why did the battle fail?
The mines blew, almost to perfection. As we saw with the Northumberlands, they had perfect surprise, quickly capturing the rattled defenders.
But the situation was a total mess.
Unfortunately, for a type of warfare like what was seen in World War I, with things like artillery, mines, mud, and rain, it left the ground unrecognizable.
After the explosion of the St. Eloi mines, the ground was obliterated. Any semblance of a German trench was now a mess of debris, mud, and human remains. It was a factor that would later hinder the Canadian efforts just a week later.
As the Royal Fusiliers believed their objectives were met, the confusing terrain saw them capturing the wrong stretch of line. Between the Northumberlands and the Royal Fusiliers there was now a sizeable gap. The road to Craters 4 and 5 was still open, and the Germans took advantage of the opportunity.
Captured ground in World War I was no good without consolidating, fortifying, and reinforcing the line. The units that assaulted the ruined German lines needed to close the gap, which they didn’t. Then, they needed to dig in, which they couldn’t.
The Germans had a bead on the British position, bringing heavy artillery fire. With no trenches to hide in, the British were forced to crawl around and hug the muddy, cold ground. Digging in was nearly impossible, especially for the Royal Fusiliers, who had lost much of their effective firing strength.
While the British tried to meet the third requirement, reinforcing, there was nowhere to send these newcomers too.
The 1st Royal Scots Fusiliers and the 12th West Yorkshire Battalion moved up to relieve the attackers and bolster the lines where they were victims of the crushing German artillery.
Making matters worse was the state of the ground surrounding St. Eloi. The terrain was naturally water-logged, with thick, claylike mud. Without existing trenches and the ground torn up, there was nowhere for the relieving forces to hunker down or seek protection during artillery bombardments.
The Germans, who were exemplary trench builders and engineers during World War I, had devised a drainage system in their St. Eloi trenches that was destroyed by the blowing of the mines.
While the British failed to connect their lines and entrench, the Germans had moved into Crater 5, creating a dangerous gap and pathway through the British lines. This was the spark for a series of back-and-forth battles. The Germans repeatedly tried to expel the British from whatever remained of the Mound, while the British kept up efforts to dig in.
So, why were the British not victorious at St. Eloi?
You might think: they were. They blew the lines, took the rest of the Mound, and eventually held off German attempts to take the craters back.
It all tied into the later Actions of the St. Eloi craters. The next installation of this saga, which will be the next article coming, focusing on the Canadians, will tell the last tale of this battle. The Canadians moved into the lines a week later, fighting in a futile struggle that ultimately ceded the lines back to the Germans.
In this early part of the story, the British failure to understand the terrain and a lack of future planning cost them the initiative. The British had been living in the Ypres sector since October 1914 and knew what the terrain was like. Artillery, rain, snow, sleet had pummeled the ground surrounding St. Eloi, and churned up by underground mines throughout that stretch of time. A greater reconnaissance of the ground could have given them a better feeling for the impending situation.
Confusion about the terrain cost the Royal Fusiliers their aim on the first day, leaving a gap the Germans could exploit.
With the destroyed state of the trenches they did capture, the British failed to plan for this contingency. At this point in the war, the British would have known that to keep any gains would require them to either take in-tact trenches or quickly dig in, which was impossible because of the state of the ground and the constant German artillery.
There was, in some respects, a successful outcome of the mission. The Germans were now tied up in trying to take back the high ground around St. Eloi. With the British objective being to keep the reserves from moving towards Verdun, they at least succeeded here.
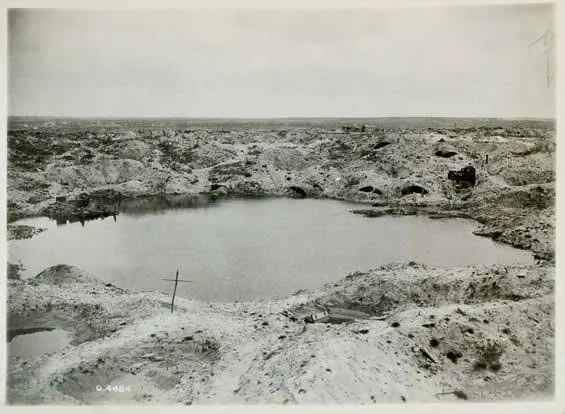
This post-war image shows one of the St. Eloi Craters. This exemplifies the type of terrain surrounding them. Notice the water-filled crater.
This sets the stage for the next phase of the battle.
My real, early interest in the Actions of the St. Eloi craters was drawn towards the Canadian phase of the battle. But I felt that the history would be better served by summarizing the battle’s background.
The British, while they blew the mines, destroying the ground, were now in an impossible situation.
The six craters at St. Eloi were deep, quickly filling with water, and hardly worthy of being a fortification. The only hope for taking advantage of the captured craters was to dig in around them, but that required time.
With the British 3rd Division in need of rest and refit, the newly arrived Canadian Division was sent into the fray. In the first week of April 1916, the Canadians were ordered into the St. Eloi mess with orders to create a new front line of trenches. They stepped into the line on the eve of a German push to recapture the remnants of the Mound.
Thanks for reading.
Next week I’ll be delving into the Canadian situation at St. Eloi, bringing to life my great-grandfather’s experience. This article sets the stage for the future horrors of that Canadian action.
History on a Whim, for those who are new, is a mix of articles, research notes, historical resources, and in-depth reviews of history books. My goal is to instill a passion for history at a time when it’s more threatened than ever. Anyone who subscribes to my content helps this mission! Please consider becoming a free or paid subscriber to help me keep this going.
This article was originally written on my Substack, which is the quickest way to get my posts sent right to your email. There are options to become a paid subscriber on the site, but with the free tier you get my articles, The History Finder newsletter, and many other things. I’ve recently started an online book club over on Substack. Over there the main reading guides and reviews come with the free tier, but to join the discussion you’ll need to become a paid subscriber. We’re currently working our way through official U.S. Publications written from the German perspective of World War II. The readings I’m offering right now are free with a link. So, if that interests you then you should check it out! Link is right here.
You can also support my work with a onetime donation here.
Until next time, enjoy those trips down the rabbit hole and don’t forget to save your sources!